You stare at your bank statement, wondering where that $5 monthly charge is coming from. Then it hits you—that Substack newsletter you subscribed to six months ago and haven’t opened since February.
We’ve all been there. Subscription fatigue is real, and knowing how to cancel a Substack subscription quickly can save you both money and inbox clutter.
Whether you’re trimming digital expenses or just clearing out newsletters you no longer read, the process should be straightforward. But Substack doesn’t exactly put the cancellation button front and center.
So what’s the fastest way to stop those recurring charges without having to dig through endless settings pages? The answer might surprise you…
What is Substack and How Do Substack Subscriptions Works
Substack is a platform that lets writers publish newsletters directly to their readers. Think of it as a simple way for creators to send their work straight to your inbox while getting paid for it.
The subscription model is pretty straightforward. Writers create content, and you can subscribe to get it delivered to your email. When you subscribe, you’re essentially saying, “Yes, I want to read what this person writes.”
The platform handles all the boring stuff—payment processing, email delivery, and subscriber management—so writers can focus on creating content instead of wrestling with tech issues.
Types of Substack subscriptions (free vs. paid)
There are two main flavors of Substack newsletters:
Free subscriptions: These cost you nothing. You sign up with your email address, and boom—you get the writer’s content delivered to your inbox. No credit card needed.
Paid subscriptions: This is where you open your wallet. You’re paying for premium content, which might include:
- Exclusive articles
- Community features
- Comment privileges
- Special access to the writer
Many Substack writers use a mixed model—some free posts to attract readers, with the good stuff behind a paywall.
Substack Billing Cycles and Payment Methods
When you sign up for a paid Substack, you’ve got options:
| Billing Option | How It Works |
| Monthly | Charged every month on the same date you subscribed |
| Annual | One payment per year (usually at a discount) |
For payments, Substack keeps it simple with credit cards and debit cards through Stripe. They don’t mess with PayPal, Apple Pay, or crypto.
Your subscription automatically renews unless you cancel it. The charge will hit your card on the same date each month or year, depending on which plan you chose.
Follow these Steps To Canceling Substack Subscription Form Your Account
Logging into your Substack account
Getting tired of your Substack subscription? No problem. The first step to cancel is logging into your account.
Head over to substack.com in your browser. Click the “Sign in” button in the top-right corner of the homepage.
Enter the email address you used when you created your account. Check your inbox for the login link Substack sends you (they don’t use passwords). Click that link, and you’re in!
If you’re already logged in on your device, you can skip this step entirely. Just make sure you’re logged into the correct account if you happen to manage multiple Substack subscriptions.
Navigating to subscription settings
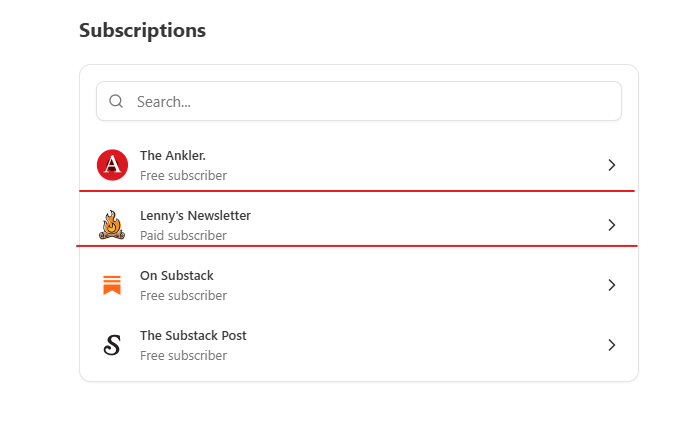
Once you’re logged in, you’ll land on your Substack homepage showing all your subscribed newsletters.
Look for your profile icon in the top-right corner and click it. A dropdown menu will appear.

Select “Settings” from this menu. This takes you to your account settings page, where you can manage all aspects of your Substack experience.
On the settings page, click on the “Subscriptions” tab. This is your control center for all the newsletters you’re paying for.
Finding the cancel option
Your active subscriptions will be listed here. Find the specific newsletter you want to cancel and look for the “Edit” or “Manage” button next to it.
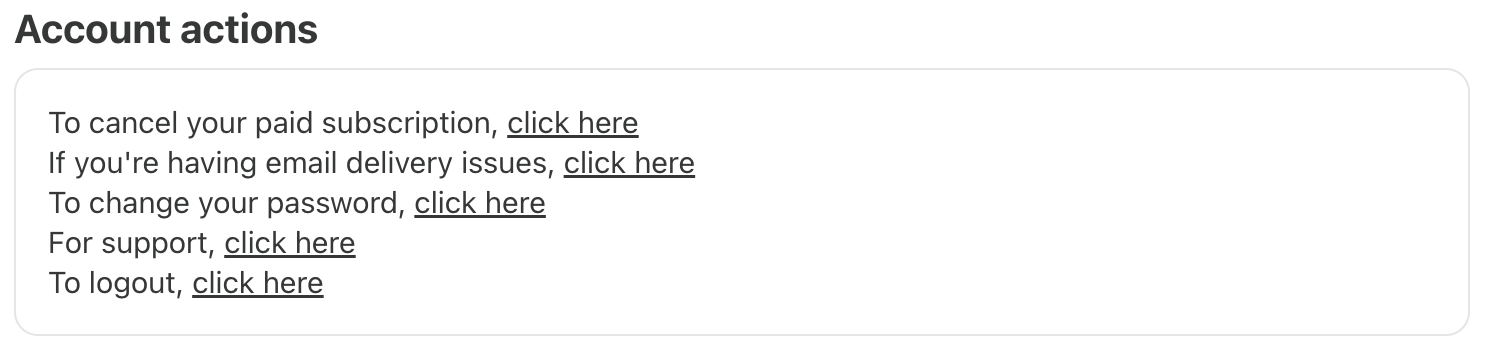
Click this button, and you’ll see a new set of options specific to that subscription. Scroll down past your payment information and subscription details until you spot the “Cancel subscription” link. It’s usually in smaller text near the bottom of this section – not super obvious, but definitely there.
Confirming Cancellation
After clicking “Cancel subscription,” Substack will ask why you’re leaving. They might offer alternatives like pausing your subscription or switching to a free tier.
If you’re sure about canceling, select your reason from the dropdown menu or fill in the optional feedback box. Then click the final “Cancel subscription” button.
You’ll receive a confirmation email once everything’s processed. Your access will continue until the end of your current billing cycle, so you’re not losing any days you’ve already paid for.
That’s it! Your subscription is now canceled, and you won’t be charged again.
Alternative Cancellation Methods
A. Canceling through email
Sometimes the standard cancellation method doesn’t work, or maybe you just prefer email communication. Good news—you can cancel your Substack subscription by sending an email directly to support@substack.com.
In your email, make sure to include:
- Your full name
- The email address associated with your subscription
- The name of the publication you want to cancel
- A clear statement that you want to cancel your subscription
Support typically responds within 1-2 business days to confirm your cancellation. Keep in mind that you won’t get an immediate automated response, so if your renewal date is approaching soon, try the main cancellation method first.
B. Using the Substack mobile app
Got the Substack app? Canceling through it is pretty straightforward:
- Open the Substack app on your device
- Tap on your profile icon in the bottom right corner
- Select “Subscriptions” from the menu
- Find the publication you want to cancel
- Tap on it and select “Manage subscription.”
- Choose “Cancel subscription” and follow the prompts
The mobile app interface might look slightly different from the website, but the cancellation process follows the same general flow. If you run into any weird glitches or errors, try the website method instead.
C. Contacting the publication directly
Still stuck? Most Substack writers want to make cancellation hassle-free. You can reach out directly to the publication owner by:
- Finding the writer’s email (usually in their about page or at the bottom of their newsletters)
- Sending them a polite message requesting cancellation
- Including your subscription details
Many writers will help you cancel or at least point you in the right direction. They’d rather have happy former subscribers than frustrated ones!
Managing Your Substack Subscription Before Canceling
Before canceling, you might consider:
- Pausing the Subscription: Some newsletters allow you to pause instead of canceling, giving you a break without losing your spot.
- Changing Billing Frequency: Switching from annual to monthly billing could reduce your financial commitment.
- Unsubscribing from Emails Only: If you’re overwhelmed with emails but still want access to the content, you might be able to disable email notifications without canceling the paid plan.
Managing your subscription smartly can sometimes solve the problem without a full cancellation.
What Happens After Your Substack Cancellation
Once you cancel a paid Substack subscription:
- No Future Charges: You won’t be billed again unless you resubscribe.
- Content Access: You’ll retain access to premium content until your billing period ends.
- Email Delivery: For free newsletters, you may still receive emails unless you unsubscribe entirely.
Always check your email and payment settings to ensure cancellation is fully processed.
Also Read : How Can Email Marketing Fuel Your Overall Inbound Strategy
Conclusion
Canceling a Substack subscription is a straightforward process, but it’s essential to understand your options before doing so. Whether you’re taking a break, cutting costs, or simply decluttering your inbox, knowing how to manage your subscription efficiently will help you make the most of your Substack experience. If you ever wish to rejoin, resubscribing is just as simple.
![Is Digital Marketing a Pyramid Scheme? The Truth Finally Exposed [2025 Guide]](https://mladtschsizi.i.optimole.com/w:360/h:240/q:mauto/rt:fill/g:ce/ig:avif/https://clickosaga.com/wp-content/uploads/2025/03/61d657db-bf23-45a0-9b99-9d871c146d21.png)

